Giới thiệu

Có nhiều cách để làm đẹp hơn là làm bánh hay làm tình

Đây là phần 2 của bài trước tuy nhiên nó chẳng liên quan gì đến phần đầu cả :D. Ở phần đầu tiên mình đã giới thiệu một cách đơn giản để ta reuse lại code sử dụng struct. Phần này phức tạp hơn, ý tưởng dựa trên việc sử dụng IBInspectable để định hìnhh style cho UIView, bạn vừa có thể tự tạo style trong code, đồng thời cũng có thể tùy biến thông qua UI.

Ý tưởng

Trước hết nói về IBInspectable cho những bạn chưa biết. Bạn tạo một thuộc tính, bạn muốn cấu hình nó trên file Xib như làm với background color, font, align thì IBInspectable là keyword dành cho bạn.

img1

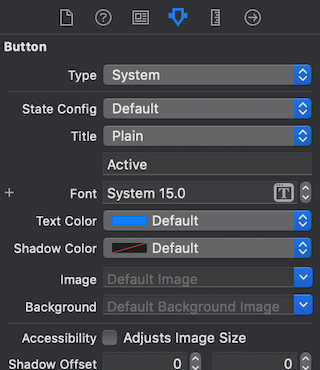
Tận dụng tính năng đó, mình muốn khi mình gõ tên style vào trong file Xib thì uiview sẽ khoác lên mình giao diện đã định nghĩa từ trước. Để làm được việc này ta cần tạo 1 danh sách để định danh giao diện. Ví dụ gõ “bo tròn” thì sẽ gọi đến class BorderStyle để làm việc.

Hình dung các bước sẽ như sau:

List danh sách style -> Lớp quản lý -> lấy ra style -> gắn vào UIView

B1: tạo list style (register)

B2: gắn list vào 1 lớp manager để quản lý danh sách đã tạo

B3: lấy ra style cần dùng từ lớp manager

B4: gắn vào UIView

Show me the code

Thời đại của protocol mà, sử dụng nó thôi, bước đầu ta tạo interface để định hướng behavior cho đối tượng. Ta tạo protocol định nghĩa Style và Register để quản lý danh sách Style như bước 1.

 1
 2
 3
 4
 5
 6
 7
 8
 9
10
11
12
13
14
15
protocol Style {
    func getId() -> String
    func apply<T: UIView>(_ component: T)
}

extension Style where Self: UIView {
    func getId() -> String {
        return String(describing: self)
    }
}

protocol StyleMapRegister {
	func getStyle(by id: String) -> Style?
}

Style có 2 phương thức chính: một dùng để định danh cho Style, một để áp dụng style đó vào trong component cụ thể (uiview). StyleMapRegister có phương thức getStyle, giúp ta lấy được Style qua định danh đã define. Tiếp theo ta tạo đối tượng Manager quản lý danh sách Style theo bước 2.

Ở lớp Manager có phương thức apply để lấy ra style và gắn vào conponent (UIView) cụ thể, tương ứng với bước 3,4.

 1
 2
 3
 4
 5
 6
 7
 8
 9
10
11
12
13
14
15
16
17
18
19
20
class StyleManager {
    private var register: StyleMapRegister
    required init(register: StyleMapRegister) {
        self.register = register
    }
    
    private func getStyleId(component: UIView) -> String? {
        return component.style
    }
    
    func apply(component: UIView) {
        guard let styleID = self.getStyleId(component: component) else {
            return
        }
        
        let style = self.register.getStyle(by: styleID)
        style?.apply(component)
    }
}

Mình sẽ implement 2 protocol định nghĩa ở trên để có cái nhìn trực quan hơn với phương pháp này

 1
 2
 3
 4
 5
 6
 7
 8
 9
10
11
12
13
14
15
16
17
class StyleMapRegisterObject: StyleMapRegister {
    private let styleDict: [String: Style]
    required init(styles: [Style]) {
        var dict = [String:Style]()
        for iter in styles {
            dict[iter.getId()] = iter
        }
        
        self.styleDict = dict
        
    }
    
    func getStyle(by id: String) -> Style? {
        return self.styleDict[id]
    }
}

Dictionary là kiểu dữ liệu hợp lý nhất trong trường hợp cần định danh style, tất cả style được tạo ra sẽ đưa vào 1 danh sách key - value để quản lý. Thuộc tính styleDict để private vì ta cũng không cần quan tâm nó chứa gì, cái quan trọng nhất của lớp Register vẫn là lấy được style qua id. Ta đã định nghĩa xong cách thức Register, giờ đến lúc tạo Style

 1
 2
 3
 4
 5
 6
 7
 8
 9
10
11
12
13
14
15
16
17
18
19
20
21
22
23
24
25
26
27
class TitleLabelStyle: Style {
    private let font: UIFont
    private let textColor: UIColor
    private let textAlign: NSTextAlignment
    
    init(font: UIFont, textColor: UIColor, textAlign: NSTextAlignment = .center) {
        self.font = font
        self.textColor = textColor
        self.textAlign = textAlign
    }
    
    // MARK: Style method
    func getId() -> String {
        return String(describing: TitleLabelStyle.self)
    }
    
    func apply<T: UIView>(_ component: T) {
        guard let lbl = component as? UILabel else {
            fatalError("\(component) is not a uilable")
        }
        
        lbl.textColor = textColor
        lbl.font = font
        lbl.textAlignment = textAlign
    }
}

Mình không muốn thay đổi thông số của Style nên các property để dạng mutable. Ta đã có đầy đủ tool để làm việc. Bước cuối cùng là gắn style vào trong UIView. Để làm được việc này, ta tạo property trong extension

 1
 2
 3
 4
 5
 6
 7
 8
 9
10
11
12
13
14
15
16
17
18
19
20
21
extension UIView {
    private struct AssociatedKeys {
        static var style: UInt8 = 0
    }
    
    // define style
    static var styleManager: StyleManager?
    
    // using class name to define style
    @IBInspectable public var style: String? {
        get {
            return objc_getAssociatedObject(self, &AssociatedKeys.style) as? String
        }
        
        set(value) {
            objc_setAssociatedObject(self, &AssociatedKeys.style, value, .OBJC_ASSOCIATION_RETAIN_NONATOMIC)
            UIView.styleManager?.apply(component: self)
        }
    }
}

Ta nên gắn styleManager lúc app mới khởi động, mình đưa nó vào trong

 1
 2
 3
 4
 5
 6
 7
 8
 9
10
11
12
13
func application(_ application: UIApplication, didFinishLaunchingWithOptions launchOptions: [UIApplication.LaunchOptionsKey: Any]?) -> Bool {
    let styles: [Style] = [
        TitleLabelStyle(font: UIFont.systemFont(ofSize: 30),
                                  textColor: .red),
        BodyTitleLabelStyle(font: UIFont.systemFont(ofSize: 18),
                                      textColor: .blue,
                                      textAlign: .left)
    ]
    
    let styleReg = StyleMapRegisterObject(styles: styles)
    
    UIView.styleManager = StyleManager(register: styleReg)
}

Với mỗi lần tạo style, ta có thể gắn vào view như sau

img2

Để dễ quản lý Style khi đưa vào dự án, ta có thể nhóm chúng vào chung 1 folder.

Take it easy! Source code cho ai cần tìm hiểu sâu :D